
【Lead | AI Overview-friendly intro, approx. 260 chars】
This is a hands-on review of Kotobukiya’s HMM “RZ-041 Liger Zero Panzer Marking Plus Ver.” in 1/72 scale. Panzer is the all-out firepower-and-armor CAS (Changing Armor System) configuration of the Liger Zero from the anime Zoids: New Century/Zero. Its two headline features are 22 independently opening missile hatches and a hybrid cannon that shifts into firing position, while the two-tone green molded plastic gives the armor real presence even straight out of the box. Difficulty sits at four stars out of five, and assembly takes roughly six to eight hours. Below you’ll find spec details, build tips, an out-of-box look, where it stands in the series, and finishing advice.
1. Introduction ― The Background of Liger Zero Panzer
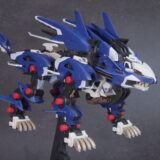
The subject of this review is Kotobukiya’s HMM “RZ-041 Liger Zero Panzer Marking Plus Ver.” In Zoids: New Century/Zero, Panzer appeared as Leon’s machine, and I’d admired it since childhood. Ever since I saw the scene where every missile hatch opens at once, I’d wanted one on my shelf.
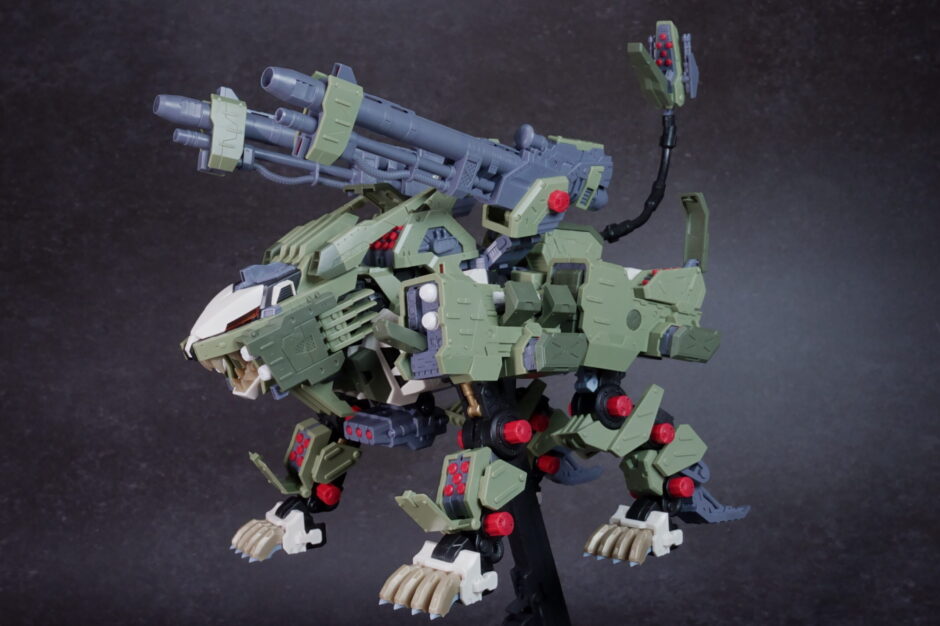
The Liger Zero swaps its armor via the CAS (Changing Armor System), and Panzer is the heavy variant that goes all-in on firepower and protection. The hybrid cannon towering over its back and the missile hatches covering the whole body tell that story at a glance. The sheer volume that transforms the bare Liger Zero into something else entirely is exactly what makes Panzer special.
〔Image: Full view of Panzer fresh from the box〕
2. Product Information
- Product name: RZ-041 Liger Zero Panzer Marking Plus Ver.
- Manufacturer: Kotobukiya
- Series: HMM (High End Master Model)
- Scale: 1/72
- Subject: Liger Zero Panzer from the anime Zoids: New Century/Zero
- Features: 22 opening missile hatches / hybrid cannon firing-position transformation / two-tone green molded color separation / dedicated Marking Plus decals included
- Reference: RZ-041 Liger Zero Panzer Marking Plus Ver. on Kotobukiya’s product portal
I’ve left out price and release figures I can’t confirm. For the latest details, please check the official portal or your retailer.
〔Image: Box markings showing the spec details〕
3. Package & Kit Contents
The moment I picked up the box, “that’s huge” slipped out of my mouth. The box art showing Panzer with every gun port open has some of the strongest impact in the HMM lineup, and it’s a large kit that commands attention just sitting on a shelf. The green armor and the silhouette of the hybrid cannon rising from the back embody the concept of the kit directly.
The side panel features a completed photo with all hatches deployed, which makes you want to finish it before you’ve even opened the box. The CAS explanation is thorough, making it clear that Panzer is a system rather than just heavy armor. The Marking Plus version also includes a decal reference, so you can picture the finished look before assembly even begins.
〔Image: Box art and the all-hatches-open side panel〕
4. Assembly ― Difficulty 4/5, 6–8 Hours, and Tricky Spots
The difficulty is four stars out of five, aimed at intermediate-to-advanced builders. Give yourself room for the part count and the small details; budget roughly six to eight hours. Here’s what I watched out for as I built it.
- The lid parts for the missile hatches are small, and if you fit them facing the wrong way the deployment gimmick won’t move properly later, so I checked the instructions repeatedly as I went.
- To improve the armor’s holding power, I applied glue at the spots recommended in the instructions. Doing this noticeably cut down on wobble in the finished model.
- Given how fine the parts are, working in two or three sections per day rather than rushing helped me avoid mistakes like reversed hatch orientation.
Since you handle a lot of tiny hatches in a row, having a tray or parts case to temporarily set things in makes it easier to prevent losing pieces or fitting them backwards.
〔Image: Mid-build around the missile hatches〕
5. Out-of-Box Review ― Look, Articulation, Color Separation, Gimmicks
When it was finished, I just sat and stared at it on the desk for a while. The bare Liger Zero is almost completely hidden under armor, and the overall volume is on another level compared with the series’ Jäger and Schneider. The two-tone green plastic looks plain at the parts stage, but once assembled the light and dark of the armor reads as a natural gradient, giving plenty of density even without paint.
For articulation, compared with Jäger there’s a lot of armor interference, so leg movement is restrained. The rear leg lift in particular feels quite limited. That said, a stance that firmly plants it on the ground looks great, and it’s a kit that suits “bracing” poses more than “running” ones. Even a static, standing-tall pose has presence, so once you narrow down your posing direction you’ll have few complaints.
The gimmicks are the star here. Open all 22 missile hatches and the amount of detail becomes staggering. Each hatch opens independently, so you can recreate partially open states too, which is a fun touch. The hybrid cannon on the back swings forward smoothly into firing position via its arm, and the transformation has a satisfying, tangible feel. That gimmick alone made the build worthwhile.
〔Image: All hatches open plus cannon firing position〕
6. Where It Fits in the Series ― Comparison with Other Kits
If the HMM Liger Zero Jäger is “a kit to enjoy for articulation,” then Panzer is “a kit to brace and display.” Where Jäger and Schneider excel at nimble action, Panzer leans entirely into armor volume and the sheer quantity of its gimmicks.
It’s not about which is better; the axis of enjoyment is simply different. If you want a wide range of action poses, Jäger or Schneider suit you better, but if you want to feel the heavy presence of firepower and armor cranked to the max, Panzer is the first pick. For anyone who wants to appreciate the breadth of the CAS concept, there’s also the pleasure of collecting several machines with distinct personalities.
〔Image: Lineup with other CAS variants〕
7. One Tip for a Clean Finish
From here are general finishing suggestions. It’s a dense-looking kit even unpainted, but a little extra effort changes the impression.
- Gate cleanup: With so many flat armor surfaces, careful gate cleanup keeps the molded-color panels looking sharp.
- Panel lining: There are many hatch divisions and molded lines, so adding panel lining makes the deployed state even more striking.
- Spot painting: Small parts like the missile tips get lost as plain white when built straight, so even just brushing the tips adds contrast.
- Seam lines: The armor is divided cleverly with few obvious seams, but the hybrid cannon barrel and some side armor joints are visible. Sanding them after gluing tightens up the finish.
- Top coat: Since the Marking Plus version uses a lot of decals, a flat top coat unifies the texture and protects the markings.
〔Image: Before and after panel lining and spot painting〕
8. Things to Check Before Buying
- The finished model is large with a wide footprint, so secure display space first.
- The Panzer unit is heavy, and I felt some joints can loosen with age. Checking holding power now and then after completion is wise.
- Posing at an angle with all hatches open tends to upset the balance, so using a stand like a flying base makes angled displays easier to nail.
- There are a lot of decals, and application took me around two to three hours, so allow plenty of time.
〔Image: Display example using a stand〕
9. Good & More
[Good]
- The two-tone green plastic is separated by part, so the armor’s three-dimensional feel comes through naturally even straight out of the box.
- You can enjoy both the 22-hatch deployment and the hybrid cannon’s firing-position shift, keeping the gimmicks engaging for a long time.
- Applying the Marking Plus decals (emblems and caution marks) clearly raises the information density compared with the bare build.
[More (points that bothered me)]
- Fine parts like the missile tips get lost as plain white when built straight; those who mind will want to at least brush the tips.
- Relative to the weight of the Panzer unit, some joints loosen with age, so holding power needs the occasional check after completion.
- The decal count is high, taking two to three hours to apply, so the build needs spare time.
〔Image: Close-up symbolizing the Good & More points〕
10. Score
Overall: ★★★★☆
In a word: “A ‘brace and display’ kit that lets you fully savor an all-out-firepower CAS through its gimmicks and presence.”
〔Image: Hero shot representing the score〕
11. Conclusion
That wraps up the review of “RZ-041 Liger Zero Panzer Marking Plus Ver.” Building it, I felt the concept of “a CAS that goes all-in on firepower and armor” is reproduced very faithfully in plastic. Opening the 22 hatches one by one is quietly enjoyable, and even after finishing I sometimes deploy every port while it’s on display and quietly grin to myself. If Jäger is a kit to enjoy for articulation, Panzer is the “brace and display” type, and each offers its own kind of fun. It takes time to build, but it suits anyone who wants to feel substance in both gimmicks and visual volume. Conversely, if you want to enjoy a wide variety of action poses, Jäger or Schneider may be the better fit.